Hildebrandt's Palace is one of the most mechanically intense Abyss dungeons in
Lost Ark and is fun to play through.
The last Phantom Palace dungeon and the previous level one Abyss dungeon,
Hildebrandt's Palace is one of the more mechanically dense Abyss dungeons
currently available in Lost Ark .and it's a lot of fun. Once players get used
to playing this dungeon with a minimum item level of 460, they will likely
find that they enjoy replaying it after every weekly reset because it's just
the right balance of mechanics and flair.
Within the finale of this modified version of Roendel's important story quest
dungeon, players will fight the Queen of the Phantom Legion and have two
different encounters with Brelshaza, one of the story's most important
characters. So, without further ado, it's time to tell you what players need
to know to complete the Hildebrandt's Palace Abyss Dungeon raid in the Lost
Ark.
Quick & Concise Upgrade Guide
Those that have already completed this Abyss dungeon ahead of or currently
know every little thing they have to have for Lost Ark's Raid Content material
are probably only hunting for any quick guide to brush up around the vital
elements. Properly, that's precisely what this 1st section covers: a condensed
version with the rest of the Guide that covers the key points in a single
fantastic snippet.
Hildebrandt's Palace is split into four sections: The Phantom Legion
Queen boss fight, a reasonably long mob clearing section, the first phase of
the Brelshaza fight, and the second Brelshaza fight.
The Queen of the Phantom Legion only has one mechanic players need to
remember, the teleport mirror. When the Queen comes to the center of the stage, and mirrors appear on the
arena's edges, the time has come. Players must quickly interact with a colored
mirror that has another mirror of the same color on the opposite side of the
incoming purple energy wave to get to safety. They should never interact with
purple mirrors, which teleport players to the center of the arena, usually
inside the deadliest Energy Wave itself.
Brelshaza 's first phase also has only one mechanic to remember, the
Rolling Boulders fight phase. With 14 and 6 HP bars remaining, Brelshaza tilts the stage, spinning the
blades at the bottom and endlessly spawning boulders descending from the top
end. The player using the red indicator below their feet will be the single
who should keep close to her, and when the Meteor hits the player and
Brelshaza, this phase will end.
In the second phase of the Brelshaza fight, there are two mechanics to keep
in mind: the stagger check and the flashlight. Checking for stagger is simple, and players only need to know when HP bars
occur, namely Brelshaza's 34th and 26th HP bar. As for the flashlight, the
mechanic happens at the 16th and 8th HP bar and is a bit more complicated.
For simplicity, if there is a red X above the player and three empty balls
above his head, he needs to stand still, and the rest of the group points
their character directly at him. As soon as the red telegraph appears, they must run as fast as possible.
Then, when it happens a second time, one player with a red cross and balls and
one with a black spotlight follow them. The player with the black spotlight
must stand still so that the player with the red cross and orbs can hit the
spotlight. Then, once again, they must run away as soon as the red telegraph
appears.
Section One: Queen of the Wraith Legion
Unlike the format followed by many past and future Abyss dungeons,
Hildebrandt's Palace starts with a boss encounter rather than a clear mob
phase. The Queen of the Phantom Legion is a bit of a tedious fight, as she has
a lot of movement abilities and quick attacks that knock players up. Luckily,
she's not too durable, so players will likely get to her only mechanic's Wipe,
Mirror & Energy Wave system before they know it.
Important mechanics: mirror and energy wave
Sooner or later, soon after the Phantom Queen's 8th well-being bar, she will
teleport to the center of the arena and begin this phase of the battle.
Players don't have to worry about damaging her during this mechanic, as the
Queen takes much less damage anyway while this is happening. Instead, players
should focus on the red, blue, yellow, and purple mirrors along the arena's
edge.
There is a pair of each mirror color. There are eight total, two of each, and
the main thing to know is that the colors denote which mirrors are
"connected". For example, when interacting with a blue mirror, the player is
immediately teleported to another blue mirror.
We recommend that you familiarize yourself with other guides to popular
tattoo-mall.ru games. Let's talk about
the secrets and tricks that you can use in games to your advantage. And also
about useful and interesting stories in video games.
Once these mirrors appear, the Phantom Queen will create a deadly wave/line of
purple energy that cannot be dodged and will cover the arena's entire
horizontal or vertical area. This wave will then move towards the players,
passing through the Queen in the hall's center. At this point, each player
must pay attention to which mirrors are on the other side of the wave and
immediately move to another mirror of the same color. Players need to interact
with the mirror as soon as the wave passes its pair, and that's it!
Nevertheless, there is certainly not significantly room for error here, as a
player who even lightly touches the purple Energy Wave will instantly die.
Also, there are two things to keep in mind about this mechanic:
-
Never touch the purple mirrors. Instead, they teleport the player to the
center of the arena, which is almost certainly a death sentence given the
way the energy waves move.
-
There's a short animation precisely where the player character raises their
hand to touch the mirror, so players must stay clear of interacting with it
early or leaving it as well late.
Normal attacks
The Queen of the Phantom Legion has many standard attacks, but the only one
worth worrying about is the Dark Wave Pizza Formation attack, as it is the
most deadly.
Dark Wave Pizza Shaping
- Standing in the middle of the arena, the Phantom Queen will send out a
dark "ring" of energy to signify that this attack is coming. She will then
summon a giant red telegraph to the entire arena with one safe piece.
Players should watch which direction the orb is spinning around it, as that
is the same direction that this safety zone will be turning in the next
part. Then, after that telegraph is complete, the Queen unleashes four
separate shockwaves, each of which deals massive damage and can quickly kill
if more than one hits the same player. Players should start in the safe zone
visible when the telegraph first spawns and then run as fast as possible
clockwise or counterclockwise, depending on the Queen's orb.
Variety of shock waves
- The Phantom Queen has many different shockwaves that work in basically the
same way. There is a variant in which she fires two conical shockwaves to
her left and right. In one, she shoots one at a time in all four main
directions, and in the other, she sends out much larger shockwaves in three
paths, followed by a massive explosion in which telegraphs were red.
Back-Dash & Shockwave
- Starting with a quick teleport back, the Queen of the Phantom Legion then
unleashes two fast conical shockwaves: one in front and one behind.
Triple-Dash & Shockwave
- The Phantom Queen teleports three times before unleashing two shockwaves
around her with conical telegraphs.
Dark Portal Flurry
- Attack where the Queen pushes the player away, causing a line of dark
energy "Portals,"; which explode upwards, stunning and knocking back, anyone
hit multiple times.
Summon Marked Sphere
- The player is marked with visible red energy for five seconds. Once this
timer expires, eight red orbs will spawn at that player's location, dealing
no damage to the tagged player but damaging anyone hit by the orbs while
slowly orbiting outward.
Small energy waves
- The boss starts creating the same Energy Waves used in her Erase mechanic,
only they don't kill on hit. These energy waves also have modest gaps at
random points that players can use to dodge them.
Dark explosions
The Queen spawns some random purple auras on the ground that gently explode
after a short delay, knocking up anyone they hit.
Section Two: Defeat the Phantom Legion Pawn
As a flavor purifier of sorts to give players a breath of fresh air before
going into a tough battle with Brelshaza, there is a brief section on mob
cleaners next. Players need to wait for those stone enemies to become
targeted (which they do in groups over time) and focus on the elite at the
end of the arena, the Phantom Legion pawn.
Players should be sure to dodge the purple laser lines during this phase,
but that's the only difficulty in this section.
Section Three: Brelshaza Phase 1
Players have finally arrived at their first multi-stage boss fight, one of
the best aspects of Lost Ark's endgame, complete with Battle Workshop
intermediate sections for repairing gear, replacing consumables, or learning
the mechanics first. In the first phase of Brelshaza, many different attacks
are useful to remember, but only one "key" mechanic that players need to
know about in advance for everything to go smoothly. This is, of course, the
battle stage of Rolling Boulders.
Important mechanic: Rolling boulders.
With 14 and 6 health bars remaining, Brelshaza will begin this phase. Like
all other Boss mechanics, Brelshaza first teleports to the center of the
arena. After that, she will tilt the entire stage diagonally with her magic,
with the south side (the side the group entered from) being the lowest point
and the north side being the highest.
Next, an endless series of boulders will roll towards the players from the
arena's north side, pushing them against the spinning blades on the south
side. The spinning blades don't instantly kill players, but their damage is
no joke either.
The sequence in which these boulders roll usually allows you to avoid them
with careful positioning, but this can sometimes be unfair. In these
situations, players can use movement or dodge abilities (dash, roll, etc.)
to dodge right through these boulders, so players should use these options
with caution. The awakening roll after being knocked down also works as a
way to get through those things.
Players must watch their character's feet to complete this mechanic until a
reddish aura appears. Appears under one of them. After a few seconds, a
meteor falls and hits the area around the player's red aura. Once this
happens, the player it spawns under should immediately stay close to
Brelshaza.
If this hits Brelshaza, she will stagger, and this mechanic will end. If the
player fails to get close enough in time, the process continues, and another
red aura randomly spawns after a few seconds. Moves with push immunity or
things like the artilleryman's salvo fire mode are perfect.
Normal attacks
Outside of Rolling Boulders, the first phase of Brelshaza's fight is
visually somewhat chaotic but not that mechanically complex.
Short-range teleport
- Brelshaza disappears and then reappears briefly relatively close to where
she started and deals damage to anyone near where she lands. Players can
tell which direction it's heading from the residual purple energy on the
ground.
Dark Sphere Pull & Tap
- Brelshaza summons four Shadow Orbs around the arena in different
directions and pulls them towards him. They are sent back in four other
directions from which they did not come the first time as soon as they reach
it. Players can easily dodge the first component of this attack and move to
where the orbs initially went to dodge the second element.
Dark part
- The boss summons a light streak of Darkness in front of him, which summons
Dark Spikes just after a short period, knocking everyone hit into the air.
Explosion of Darkness
- Another environmentally hazardous move, Brelshaza spawns a series of dark
circles that burst into bubbles after a while, knocking up anyone they hit.
Dark clones
- The boss summons about four bright purple clones before him, filling the
conical blue telegraph immediately. Everyone hit by this blue telegraph is
then hit by a dark bubble of the same kind as in her Flashlight Wipe
Mechanic and is immobilized till allies attack them sufficient to empty the
purple bar under their character models. If left alone, the bubbles will pop
in about three seconds.
Dark Orb Projectile Wheel
- Brelshaza summons many bright purple, dark spheres above her head, rapidly
rotating, sending more dark spheres in random directions. These spheres
again knock back any player hit.
Light salvo
- Brelshaza summons an army of cone-shaped glowing orbs after calling the
red telegraph, which fills up quickly. These glowing spheres then appear in
sequence, moving down the entire group. They deal decent damage and knock up
any player hit by their explosions.
Multi-Ball Orb
- A compact sphere flies at a random player, moving at a low speed. After it
hits the player or makes contact with the arena behind them, it breaks into
four slightly smaller balls that spin in four distinct directions.
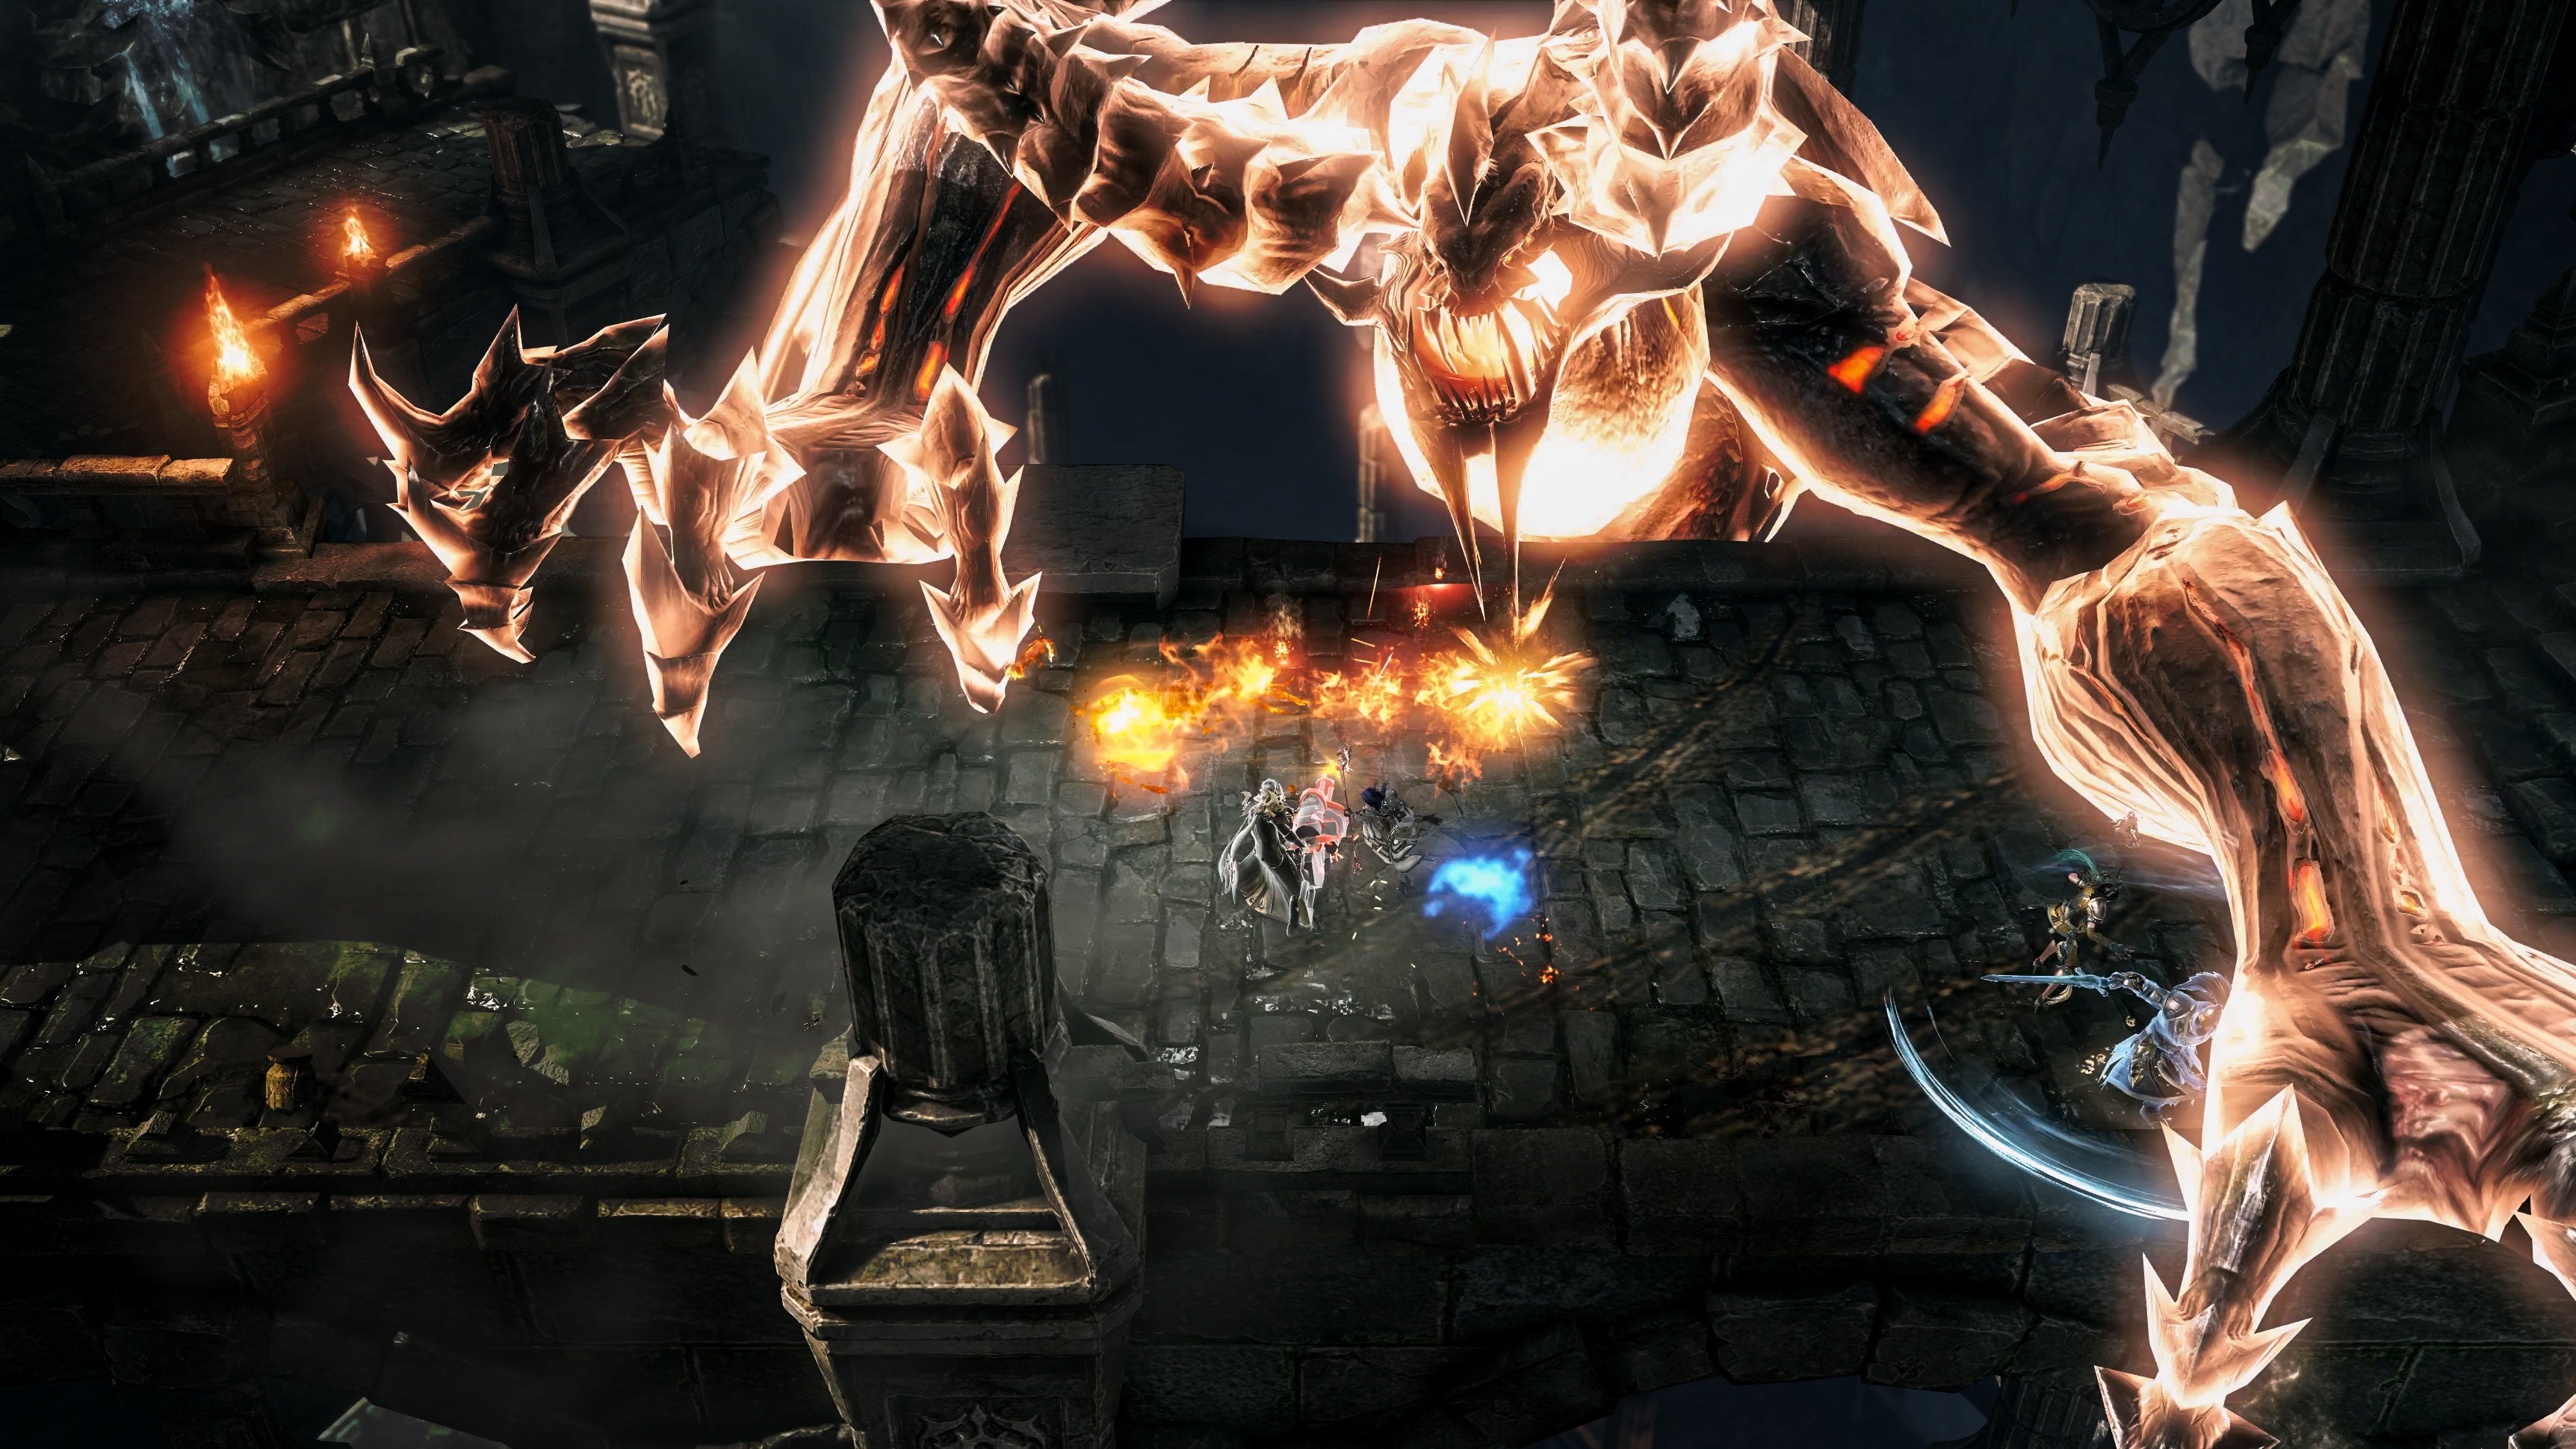
Fourth and Last section: Final phase of Brelshaza
Immediately after a quick break, it is time for the showdown with Brelshaza,
and it's considerably more mechanically complicated than the primary Story
Quest version. Fundamental attack-wise, Brelshaza includes a handful of new
tricks and enhanced moves, but it is the same as in Phase 1. The actual
danger of this phase is that Brelshaza has four erase mechanics to clear,
two stun checks, and two flashlights amplifiers; Sections of the Giant
Meteor.
Important Mechanic: Stagger Checks
So far, all of the Stagger Checks introduced in Ancient Elvira and the first
part of Phantom Palace have been straightforward. The players weren't really
"pressed in time"; they were using skills that dead stunning damage.
However, Brelshaza is the first one where things can get dicey. They can be
easily eliminated if the group doesn't immediately respond to Brelshaza's
stun checks at her 34th and 26th health bars. Luckily, they are pretty easy
to beat due to their cutscenes.
The Ancient Flame Elemental, Efernia, really gets mad at Brelshaza and shows
up to stab her with her tail and claws during those Sap Checks. The group
then attempts to deplete the Stagger Bar to break her barrier against
Ephernia's attack, causing her to be hit by the flaming beast.
If the group fails to daze her in time, Brelshaza deflects Ephernia's attack
and sends out a wave of energy that instantly erases the group. Also, it's
nice to know that Brelshaza will always teleport to the center of the scene
for a stunning check when 26 health bars are left.
Important mechanics: Flashlight and booster; Giant Meteor
This is a big mechanic that many players struggle with during the Brelshaza
fight, and it's understandable why. This mechanic occurs on Brelshaza's 16th
and 8th HP bar and can also be a mechanic that "happens" without Brelshaza
teleporting to the center from the stage or any preparation.
Once this mechanic kicks in, one of the players will notice a bright red
cross covering their entire character model (turn off friendly particle
effects to make them easier to see). Upon identification, the other three
group members should immediately realize that they are not Player X's red,
meaning " Lanterns ." This makes them key players at this stage.
The player with the red cross must move a few steps away from Brelshaza and
stand completely still. In response, the other three group members will need
to take a few steps away from the red player X and turn directly towards
them so that their light beam falls on them. If needed, players can use
elemental attacks to fine-tune this aiming.
Red member of group X. It is a giant meteor, and it barely has time for you
to get out with the telegraph, so players should start out moving as rapidly
as possible. If enough light has been directed at the player with the red X
in time, a giant red telegraph will appear and begin to fill up underneath
it slowly. If not done right, Brelshaza traps everyone with magic orbs until
they get hit by a meteorite instead. Once the Meteor hits, the mechanic will
end, and players will be able to mourn Brelshaza again.
The second time this mechanic will function ( at 6 HP bars). The rest ),
everything is a tiny different as an alternative to three flashlights and
one red X player, a red X player, and a player using a black spotlight on
the ground behind them. The red player X should stand in this spotlight for
a specific quantity of time to total the mechanic.
This black spotlight moves with all the players it is attached to and will
often keep ideal behind them, so it is most significant for the player with
all the black spotlight to remain in place and the red X to move into the
spotlight. Once again, if done appropriately, the red telegraph will appear
long enough for the players to escape.
Wipe mechanics are not that difficult to master, although it is surprising
how many players try to give up after one unsuccessful attempt. Here are
some more essential details about this mechanic:
-
If the lanterns are too close to the red cross player, they may not
"count." because of some glitched hitboxes, which is why the Lanterns
have to stand a few steps away.
-
The black spotlight doesn't always appear the second time this mechanic
is used, and sometimes it's just three flashlights again. So players
need to be prepared to adjust if it doesn't work out.
Normal attacks
This section will only cover the new and improved attacks that Brelshaza
does exclusively in this last phase, as the rest of her moveset is the same
as in phase 1:
An upgraded version of the Dark Path that Brelshaza uses only in the second
phase. This version can create multiple paths and multiple path shapes such
as circles and cones that explode into dark spikes after a short amount of
time.
The collapse of the arena
- After the first Flashlight & Meteor Mechanic, the arena players fight
with Brelshaza begins to slowly collapse from the edges, shrinking in size
over time. Not simply that, but lines of purple fire also commence to seem
at standard intervals, dealing minor harm.
Improved Dark Path
- An upgraded version of the Dark Path that Brelshaza uses only in the
second phase. This version can create multiple paths and multiple path
shapes such as circles and cones that explode into dark spikes after a short
amount of time.
Dark ring
- The boss summons a bright purple Darkfire ring that traps players inside.
Anyone who touches the fire takes continuous damage, and the ring shrinks
over time before disappearing.
Bubble Aura
- Brelshaza summons a bubble-like aura under each player that begins to
explode after being locked in the arena continuously. Players must approach
the outer edges of the arena, wait for the bubble to close, then leave it
there to come back and hit Brelshaza while it explodes away from the fight.
Summon Dark Portal Boulder
- A Dark Portal is summoned, pointing at every one of the four-party
members. Immediately after a second or two, these portals summon significant
boulders that fly towards the last position of their designated player,
dealing heavy damage to anyone they hit along the way.
Recommended Gear
Again, as with other Abyss dungeons explored so far, players don't need to
take a ton of different consumables. Of course, they can bring Swift Mantles
with them to make Brelshaza's Rolling Boulders section easier, or the giant
Meteor in phase two is less complicated to dodge, but that's up to every
single player. The only Battle Products or Engravings that might be very
advisable would be the following:
- HP Potions (Obviously, but still needs to be said)
- Whirlwind Grenades (for any stagger checks)
-
Time Stop Potions (to survive Phantom Queen's cone wave attacks or
Brelshaza's erasure mechanic attacks)
-
This is also the first Abyss dungeon where players should probably have
their preferred class engraving at level 2 or higher, and possibly even
Malice at level 2 or higher. . With properly cutability stones, this is
more than possible at this stage of the endgame without spending
Lost Ark money,
let alone thousands of dollars.


Comments
Post a Comment